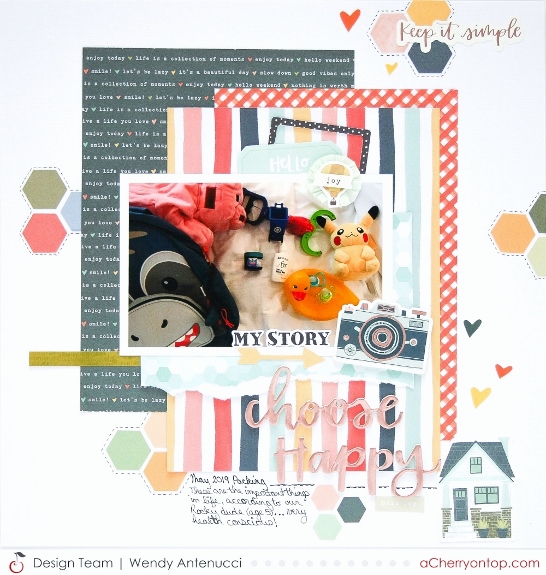
So we recently did an overnight at Mouse... I packed all of the clothes and swim gear, but my kids packed their things they needed. I didn't have time to check as we left quickly so we could start enjoying the pools...
Yep, my little man packed and I cracked up when he unloaded his bookbag at the hotel.
What in the world???
Documented using OneCanoeTwo which is one of my favorite collections.
When
I first saw this system introduced I was totally in love, the colors, the
marble look, and everything always looked wonderful… So I wanted to find out, would my ColorPour
also look magical or was it a hoax?
Well it worked! My son said
it looked like an expensive piece of art, got to love that boy! So I thought I’d share a few tips of what I
discovered while I created and the steps I followed to create. I also have included a video of my first ever
pour so that you can see how easy it is.
So here are the steps to follow for your magical art…
Step
1:Cover your area
Step 2: Pour a measured amount
of each color into each separate cups.
Then I used another cup to pour the paint in layers.
Step 3:
Pour! The way you pour really
doesn’t seem to matter, the paint is magical and it really turned out nice even
though I didn’t really think about how I was pouring. I did have trouble getting the paint to the
edges and probably should have used a bit more paint, but I was able to tap my
canvas on my surface to cause the paint to flow over all the areas.
Step 4:
Glitter… or Sparkle… or leave it
alone. I’m still tossed up over this one
and which would have been a better choice.
Some tips that might help you prepare better…
Cover your area and then cover and even larger
area! This stuff spreads and while I was
able to do it on my desk, my hands were covered with paint which proved to be a
challenge.
I chose an 8x10 canvas which fit nicely into
my lasagna pan covered in trash bags so that I could work at my desk area.If you are doing a larger pour you will need
a bigger area, but it really helped putting my canvas into a container with
sides as I could let it rest on the pan to help the pouring.
I used about 25ml of each color which was
enough for the 8x10 canvas, but there wasn’t a lot of extra.
I would probably not measure the paints as
much and just pour into one measuring cup in layers, that would cut down on the
waste and mess.
The glitter/sequins/sparkles really comes out
of the containers, I would suggest pouring some in your hands before sprinkling
it on your project.
And wear gloves as it does seem to stick
around a bit.Also I would remove any
jewelry also, I sure will next time.
I hope this tutorial has answered any questions you have, please
feel free to leave anything else in the comments and I would be glad to answer
them for you. So, what do you
think? Do you want to try making some
art?
This page is bright and colorful, full of life which is exactly what my dear friend will always be in my heart. This is a page I wanted to make as my friend has passed on and my heart still hurts, but I want to remember all the good Forever and Always.
The paper was an exclusive from the February Cocoa Daisy kit as were the chipboard alphabet and the sequins. The die cuts can be found here
So I turned 40 this past May and all I wanted was a gathering of some of our friends and an Olaf cake! I've never had a bakery cake as my grandmother always made my cakes and now I do cakes, but it sure was fun getting someone else's cake!
I created this with a Cocoa Daisy kit and some other odds and ends.
It is that time of the month again, when Cocoa Daisy reveals their exciting new kits for the month! September's kits have such a warm fuzzy feel to them and the colors are so warm and inviting, but I wasn't sure what to do with the kit at first as it is fallish in feel and we live in summer, constantly!
So I set to work and created, probably some of my most favorite layouts in the past few months with the kit. So stay tuned as I reveal them over the next week or so.
I couldn't resist going big on this one, I just love how my little boy loves his Aunt Abby!
I have a video to share on some of my tips that I use all the time when I create...
Another dance recital done and in the books! I am behind in all of the books so I decided to just jump ahead and get the recent memories in the books. As I have time, lol, I will go back and fill in the spaces. Warning, there are a lot of birthday layouts coming up then!
Isn't the papers perfect for this? Everything was from the June Cocoa Daisy kits.
Reveal night at Cocoa Daisy just took place for subscribers, and the kits are AMAZING!!!
We had my daughter's dance recital on Saturday so I only had a little time to play,
but here is my first page created.
I was inspired by my friend Suzanna to go big with my picture, plus I thought my little boy was so cute I just wanted to capture his bigger to life attitude.